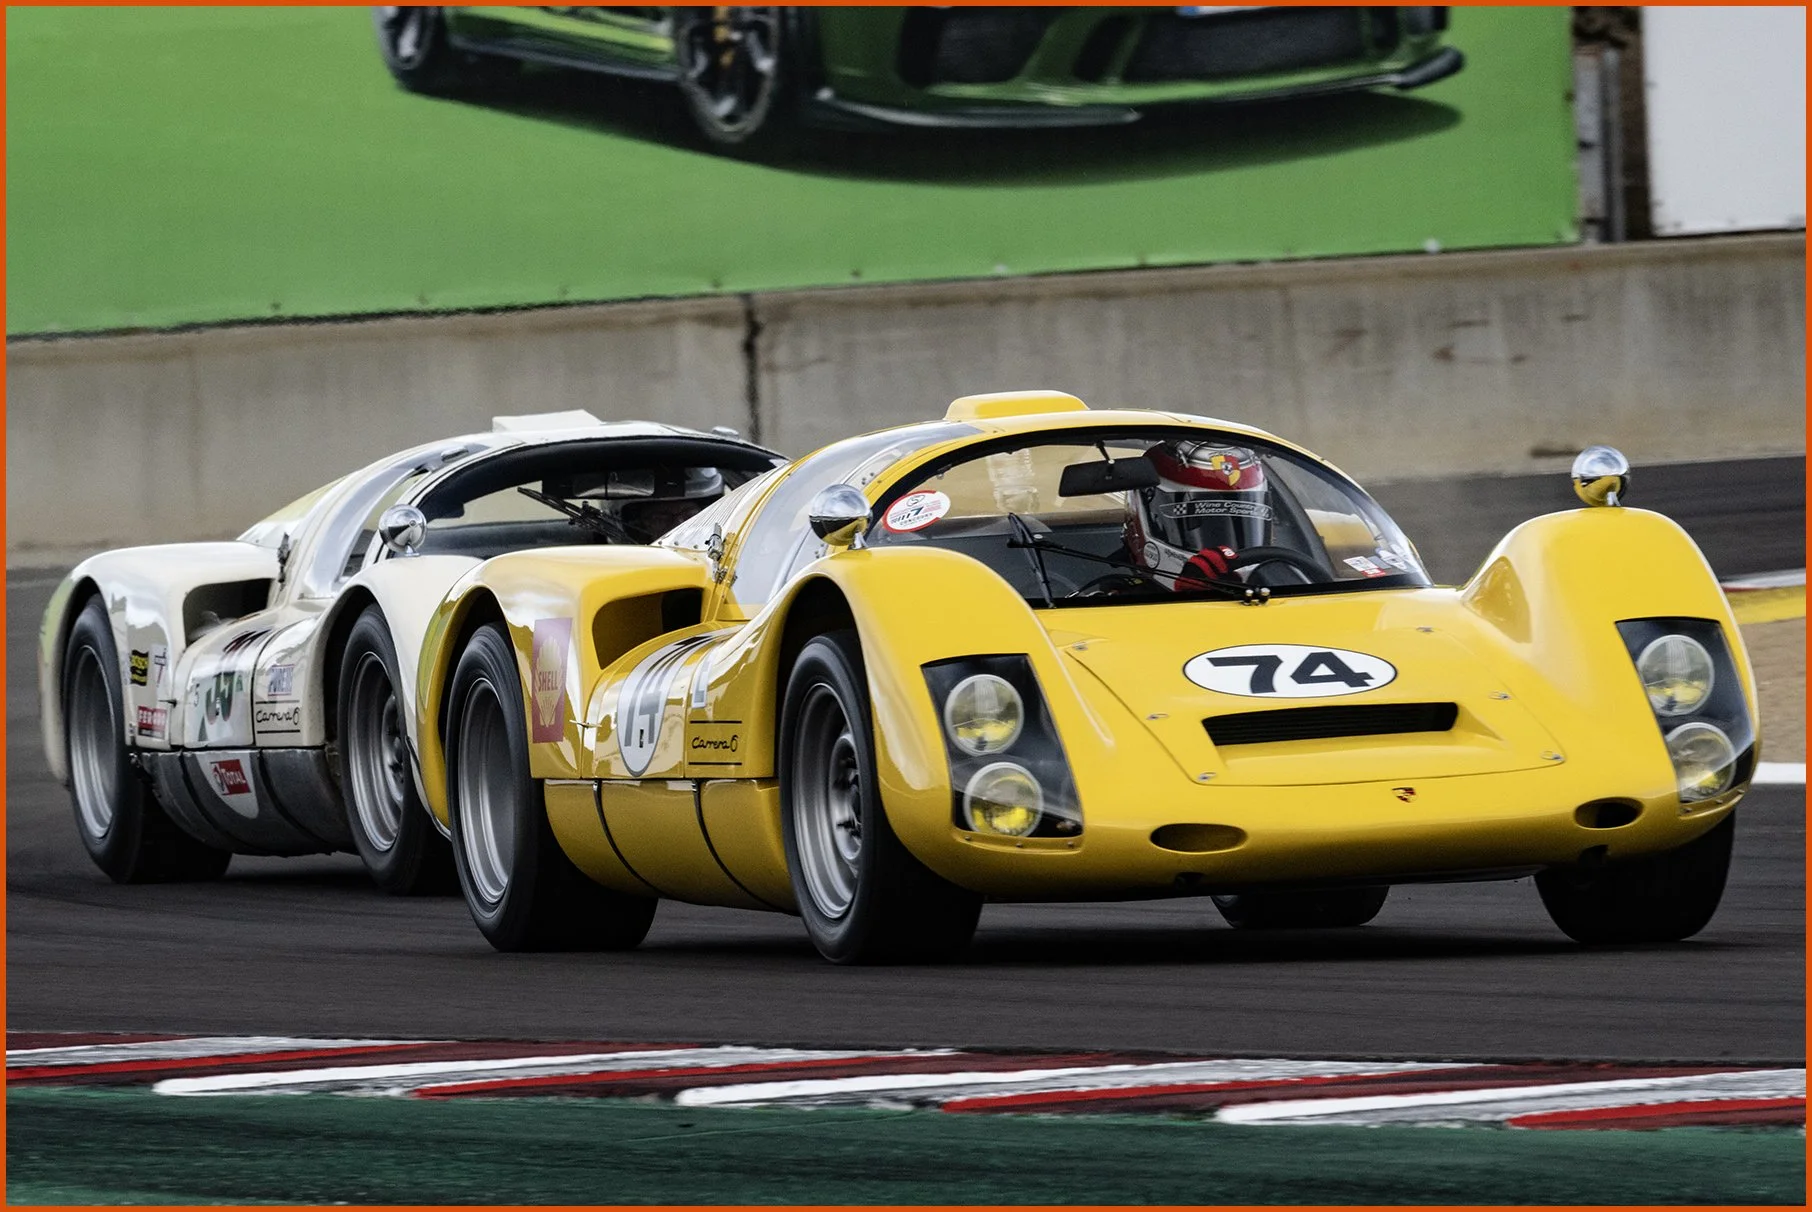
Black and White Setup

Set the view finder image to monochrome/black and white. You can then compose in monochrome/black and white. Shoot in Raw for a color image and convert to black and white.

Set Picture Control to monochrome. Shoot in raw, and you will get color in the NEF file when you download to computer (which you then have to convert to B&W). Preview of shots, on camera, will show B&W (as the previews are of jpeg). If you shoot raw + jpeg, the jpeg will be in B&W. 

Nikon Z8 and Z9 settings

The following are a few of the settings I use on my z9 and my son Kevin uses on his z8. I have them here not as a set of rules but as a place to start. You take them and modify to fit the way you shoot. 

A couple more notes on my shooting. I'll be eighty in April and have been shooting Nikon since 1960. Today I'll be shooting the z9 combined with the Nikon 180/600 mm lens. The first day of shooting that's not too heavy but by the second day or even the end of the Rolex shooting they weigh about fifty pounds. I use a monopod to help smooth out my pans as the days move along. 
I also use a polarizing filter to clear window glare.

I do not do travelog shooting of Laguna. I know the track and it's turns from years of shooting. I know my favorite turns for the time of day. I match the time of day to the group run time and then pick the turn. I may spend the morning in turn eleven for those nose to tail images or those images where the driver is illuminated with side lite for just a fraction of a second. For those interested outside turn eleven takes 200mm minimum for nose to tail images. For motion side images 24 or 28mm will do. Inside turn eleven is a kick. You will be just a few inches from the cars and the wider lenses work well. But keep your eyes open and don't get run over. 

Note: From 11am to 3pm spend your time in the paddock. Laguna's light is rather lacking for on track images during this hours.

Pick a turn-learn the turn-watch the light come to you - let the cars come to you.

Setting up your z9 or z8.

Custom Settings Bank
c. Timers/AE Lock
c1 Shutter - Release button AE-L OFF. This allows the use of the AF-On button on the back top right of the camera body to focus us the camera. NOT the shutter release button.

d. Shooting display
a1 Continuous shooting speed.  Continuous high-speed 20FPS
a2 Maxim shots per burst 40
a3 Limit release mode selections Single Frame and Continuous High
d9 File number sequence ON
d10 View Mode (photo Lv) Show effects of settings.
d14 View all in continuous mode ON

a. Focus
AF-C Priority Selection. Set to Release
      Focus Tracking with Lock On. Set to 3 to 4.  If your focus is getting stuck and not jumping to your next subject try a shorter delay. If your focus is bouncing off your subject go for a longer delay. 
       Subject Motion. Set to Steady. This choice is set for a subject that is prone to sudden stops and starts not left right or up an down motion. 
a7 Focus point persistence. Set to Auto.
a15 Manual Focus Ring In AF Mode. Used with z series lenses. Set to ON
Subject Detection set to Vehicle. You can tell in 3D when Subject Detection is working as the Green Focus Box gets smaller. You may want to experiment with Face and Bird in 3D. If your Subject detection is not working for your subject turn it off or try another setting. I have had good results with Face and Bird in 3D. Bird seems to work well for the open face helmet clear shield no sun glasses subject. In 3D the subject focus box will change size to match the size of your focus point. As the drivers face get closer the green box will focus in on his/her eyes with the green box getting smaller.

If your face detection green box keeps losing focus turn subject detection off. Use the 3D Green Box to focus. Put the green box on the driver and pan through your shot. Your panning skills relate exactly to how successful your follow focus system will work. 

Set your AF Mode and AF Areas.
Set to AF-C mode. This allows the z8/9 to pick up a focus point then follow it through your pan. It may be helpful if you pre-focus your lens to the distance/area you plan of picking up your subject. That way the 3D-Vehicle does not need to search out the subject. You pan the subject into your frame and start 3D-Automotive follow focus once the driver is in the pre Focused area.

Set ISO to Auto with a max of 3200.
Set shutter speed and f stop to manual. You pick the shutter speed and f stop you want and let the camera pick the ISO. Once you have captured your “sharp” image start to drop the shutter speed. 
Shutter speed. Start high speed 1/500 second for two or three laps. Go slower on the following laps. 

Customize the " i " menu.
AF-area mode/subj. detection. 
Vibration Reduction
Focus Tracking with Lock-On.
MeteringMonitor/Viewfinder Brightness
Focus Mode
These are the settings I use in the " i " Menu. That leaves seven boxes to be used as Nikon brings other features onto the z8 - z9. 


Burst shooting. 
This is a new area for me. I have always believed the sign of a good sports photographer was his/her ability to capture the peak moment of action in each frame of a given action.  How ever with burst group shooting the z8-z9 allows you to capture multiple moments of peak action in each action. For instance a 906 going through turn eleven with another car close behind. A burst exposure gives you the choice of capturing not only the best view of the driver but also the following car, the front wheels bouncing over the curb, rocks being thrown back at the following car, and both left and right sides of the hero yellow car. Another example. A group of five or six formula cars going through turn two. I am focused on the third driver back. With a burst group exposure I can get all six drivers moving about the frame while I keep my Hero driver in focus. 
The more frames per second the more opportunities to capture Hero images.

Set the frame rate to 20 frames per second.
Using the Release Mode wheel - that's the wheel on top of the camera far left. Hold the Lock Button down. The Lock Button is 11 o'clock to the Mode wheel. Rotate the wheel to Continuous low-speed. Low speed -  1 to 10 frames per second.
Continuous high-speed. High speed - 10 to 20 frames per second. 
Set to Continuous High Speed.

Custom Settings Menu 
D Shooting Display d1 Continuous high speed to 20fps
d2 Maximum shots per burst 40f
d3 Limit release mode selection. Continues H
d8 Limit Selectable Image Area set to FX (36x24)
d9 File Number Sequence ON
d10 View Mode Show effects of settings
d14 On
d15 Image Frame ON
d17 Grid Type 3x3
d18 Virtual Horizon Type A

These are a few of the settings I use on the z9 and Kevin uses on the z8. I suggest them only as a starting point. After the first day of shooting grab a bottle of good red go back to your hotel room down load your images and start reviewing them. . If you use the burst method of shooting do not be surprised if you return with six or seven thousand or more images. 
During the day keep notes on your shooting. Use these notes to quickly find the hero images to review go over them and see how you can modify your camera settings and your technique for the second day. 


File information on the yellow 906 images.
Overcast. Soft shadows and highlights. 
Z9 Nikon
Nikkor Z 180-600mm f/5.6-6.3
Racked out to 400mm, f/16 at 1/250 second. 
Burst at 20 frames per second, 3D set to Bird id.
Each image is cropped for impact. Please note the focus held on the drivers helmet from image 7411 to image 7434. That’s a total of twenty three (23) images that the z9 held focus on the drivers helmet. Better then I could do pushing the shutter button.

Click on the image to see larger version

Another sample of Burst shooting.
z9 Nikon
Nikkor Z 180-600mm racked out to 180mm f/22 at 1/160 second on a monopod with polarizing filter. This series ran from frame 9234 to 9240. Again I was using 3D follow focus with Bird recognition. They have all been cropped. The second version of frame 9237 is cropped simerly to the version I printed. These are also an example of letting the light and the cars come to you. Earlier in the day the light would not have been as interesting. Then of course it’s the second car lit by the setting sun that ads visual impact.

Click on the image to see larger version

Optimizing an image for publishing on a website/blog.

The first image is a full size un-cropped fresh from my Nikon D800 7360 pixels by 4912 pixels at 300 pixels per inch. 1-DSC_0258.jpg

The image is of a 1973 BMW CSL driven by Chandler Briscoe in Portlands turn three early Saturday morning. Camera specifications are Nikon D800. Color space RGB. Lens focal length 200mm.  Lens 200-500mm f3.5-5.6 Nikon. 1/250 second at f10. I used a mono pod with a swivel head.

Keep in mind the early light allowed me to capture the CSL with nice high back light. Lower side panels and the front are in shadow as is the drivers face. There is a high lighted fence rail in the background over the front camera left corner of the car that is a bit distracting. The tire wall just in front of the camera has a strong high light.  The back light has given the fences and bleachers in the back ground lots of texture.

My publisher Sportscardigest.com requires images that are 1500 pixels by 1000 pixels with captions. I include a © notice in the metadata panel.

Original Image

Original Image

First step is to crop the image to 1500x1000. I do not change the dpi at this point. I will drop the resolution down to 72 dpi from 300 dpi as the last step in preparing the image.

Considerations when cropping this image:

1.  Make the car a larger part of the finished image.

2.  Keep the textures and colors of the back ground and foreground.

3.  Show where the CSL is coming from at the same time giving space in front of the CSL to show where it is going.

4.  Don’t worry about centering the image. Off center may ad visual impact to the image.

Cropped Image

Cropped Image

Second step is to enhance the color and shadow detail. I use PhotoShop’s Exposure control and lower the exposure by -0.30. This darkens the orange helping it to separate from the background BUT it darkens the front of the car and the drivers face. The inside of the wheels may also use some help. I use PhotoSops Shadow control and open the shadows +60. These two adjustments enhance the orange with out losing detail in the shadow area of both the car and the background.

Enhance Color

Enhance Color

Third step is using PhotoShops Dodging tool to lighten the drivers face and the inside of the wheels. First I enlarge the image allowing me to easily maneuver the dodging tool. Remember less is more here. Don’t make the area you are dodging scream “I have been worked on”. Subtle subtle subtle when using the dodging and or burning tool.

Dodge Tool

Dodge Tool

Fourth step is the PhotoShop Clarity tool. I set the clarity tool to +35. This is an arbitrary setting to what looked good to my eye for this image. Experiment with this tool and all the PhotoShop tools. Again less is often more.

Clarity Tool

Clarity Tool

Fifth step is using PhotoShops Cloning tool to remove the high lighted railing in the back ground. Again enlarge the image. Set the cloning tool to a soft edge, here I used 12%. Take your time and experiment with size and hardness of the cloning tool.

Cloning Tool

Cloning Tool

For many this may be the Hero or Finished image.

Sixth step is using Photoshop’s filters found under Image-Adjustments-Photo Filters-Warming Filter (85) I added 15%. This really helps the tire wall and the tire in the lower front come to life. After all this is the West Coast where our light is known for it’s golden warm glow especially early morning and late afternoon light. Help Momma Nature a bit with this warming hero.

Add Filter

Add Filter

A Step Too Far?

Step seven using PhotoShop’s Vibrance tool set +20 and the Saturation tool to -40.

Is this the look of an old print that has been hanging on your wall for almost forty years? Is it an interesting look?

7-post-DSC_0258.jpg

One last step. Reduce the image size to 1500 pixels by 1000 pixels at 72dpi for web publication.

Hint. You may use any steps after the fifth step as an optimized image for printing. But remember each printer has a “look”. Balance and test your images to produce the best images from your printer.

Hint. The same holds true with web sites. Test your images to find the best balance for the web publishing your images.

Hint. I may have over dodged the drivers face and or the wheels. Remember less is more when dodging and burning. For that matter almost any PhotoShop modification of your images will profit from the “Less is More” mantra.

Tips for Better Panning

Perfecting this technique to show motion.

The first tip is practice. Be sure to bring a large container of patience to combine with practice.

Panning is movement. It’s the panning of the camera to match the movement of your subject. The object is to show a sharp subject along the plane of movement while the background remains stationary. By panning with your subject the movement is reversed the moving subject (car) is sharp and the stationary background is blurred into movement. The amount of background blur will depend on the ratio of your subject’s speed past the background and your camera’s shutter speed.

Sound simple? It is the shutter speed, subjects speed and your ability to match both with a smooth continuous panning camera movement. It’s how you combine these three that will determine the success of your shoot.

Choosing a shutter speed.

How fast is the car moving and how fast do you want it to appear to be moving? The amount of blur in the background contrasted with the sharpness of the car is what gives a look of speed/motion to an image. I shoot the first couple of laps at a relatively fast shutter speed often 1/500 or 1/250 second. The reason, I want to insure I have a sharp usable image for my publisher. Third lap I drop down to 1/60 second and start to move my shutter speed around. The slower the shutter speed the more important a smooth panning technique is.

Focus:

To show motion it’s important to have something on the car sharp. Set your shutter at 1/160 second and use your auto focus to follow the car. Place the Focus Point on the driver and follow him/her through the pan. He/she will likely be sharp with the front and rear of the car blurred and the background heavily blurred.

Pre-determine where on the track the car will be when you want to capture it. Face that spot and square your feet up to the spot. Twist from your waist to place the car in your viewfinder panning to follow the car through the turn. Push the shutter down part way for activating the follow focus as soon as you start to pan. Make your exposure while continuing to twist your body to follow the car exiting the turn. One smooth panning motion from the car entering the frame to the exposure to it’s exiting the frame. I can not over stress the importance of one smooth motion from beginning of the pan till the end. Like a swing of a baseball bat it’s all about smoothness and followthrough.

Another method of Focus:

Use the AF-ON button the rear of the Nikon D Cameras. Touch the button with your thumb focusing on a targeted area. Release the button locking the focus. As the car passes through your pre-focused area shoot one or two exposures. This allows you to place your subject anyplace in your frame and it will be focused as it enters the area you have pre focused on.

I almost always use a mono pod with longer lenses. But if you are able to set your feet establish a solid base then pan using a smooth combination of movement from your knees and waist you may not need a mono pod. Shorter lenses, say 200mm or shorter I hand hold. One hand firmly grasping the camera body the other supporting the lens. The strap around my shoulders pulled tightly in. Elbows in tight against my body. A firm camera support combined with a smooth panning motion.

“Hint” The closer the car is the less motion you need to show speed.

The more contrast of light and dark combined with contrasting colors in the background all help to add motion/speed to you image. If you can shoot through trees, leaves or spectators better yet. An out of focused blurred shape in the foreground with a sharp car against a blurred background is hard to beat.

“Hint” Use Nikon’s Vibration Reduction Control and Canon’s Image Stabilization systems for better results. I use Nikon’s VR set for Normal when shooting panning images. The Sport or Active setting when shooting car to car or from a plane or boat. But again experiment and see what works for you and your camera lens combination.

“Hint” All this panning is simple. The hard part is bringing it all together consistently. Matching the shutter speed to your subject’s speed. Then supporting your camera/lens through a smooth panning motion.

Practice before you arrive at the track. Use a local freeway for a longer lens. Use bicycle riders at the park for shorter lenses.

First Hours at the Track

Do you know where to go to pick up credentials? Is it at the track or someplace in town?

Arrive early. Earlier the better. Walk the pits early in the morning. The early morning light is the most beautiful of the day, low angle and yellow. Morning back lit sheet metal or engine parts are something special to say nothing of portraits captured in the morning.

Have you checked with the track to be sure you are at the first media meeting. Do not miss this. You will get all the news of the event, meet other photographers and make new friends.

Look for and grab event schedules, entry list, track maps, rumors, innuendo and out right lies spread by other photographers and media types. Check to see if the track is furnishing a lunch. If so where and when? Is the track furnishing cold bottled water. Grab two.

Will the track be furnishing any transportation around the track for photographers? Where do you grab a ride. Take a handful of $ to tip the drivers.

Grab a media room locker and lock if they are available. Great place to store extra equipment rather then leave it in your car or carry it around the track.

Introduce your self to the track’s press staff and leave your card.  After the event send him or her a selection of images for the tracks use. This needs to be done within a week of the event. I have even sent images Friday and Saturday night. It’s all about making a positive impression to help insure your welcomed back.

Watch how your fellow media types handle themselves around the track. Go out of your way to get along with any and all track staff. Many of your compatriots will argue or get hot over directions given by track personal. You can not and will not win any arguments with these guys. Just make the best of it till you can get back to the media center to ask for a clarification. Do not get a reputation as a hot head. After all you need a good relationship with these guys more then they need one with you.

After the media meeting head out to you first shooting location. Leave any equipment you will not be using in the locked locker. Take with you only what you will need on location. Be sure to have extra memory cards, camera battery, sun screen/damp wash cloth and water. 

Setting Up Your Equipment Before Leaving Home

Memory Cards. My Nikon D800 takes two cards one CF CompactFlash and one SD Secure Digital card. Reformat the cards to “blank” before going to the track. There is nothing like reloading in the midst of a cars on track session only to discover your memory cards need to be reformatted.

“Hint” I have my cards numbered into sets then stored in a ThinkTank Pixel Pocket one set per pocket. Title side out for blank cards and white side out for full cards.

“Hint” Check out ThinkTank.com for professional bags that are well thought out and built tough.

“Hint” Bring more memory cards then you think you need.

Camera. Clean and dusted before you leave home. Set the exposure method you wish to use. White card method. Follow focus method. MAKE SURE ALL YOUR BATTERIES ARE CHARGED. Both the battery in the camera and your extra batteries.

“HINT” I have gotten in the habit of changing batteries each day during the lunch brake insuring that I have a fresh battery for the afternoon.

Equipment Bag. I use a ThinkTank.com Airport Navigator roller bag. A small well designed bag that holds am amazing amount of equipment. I also use a soft easy to stuff or fold bag as a shoulder bag around the track. Leaving the roller in a locked locker I use the soft shoulder bag to carry an alternate lens and a few miscellaneous pieces.

This is an ongoing and forever changing list.

1.  Rain cover for your camera.

2.  Rain cover for your camera bag.

3.  Selection of empty ZipLock bags.

4.  ZipLock bag of extra camera/lens caps.

5.  ZipLock bag containing battery charger and extra battery.

6.  Lens and camera cleaning kit.

7.  ZipLock bag with any extra adapters or tripod locks.

8.  Business cards. Have more then you think you will ever need.

9.  Polarizing filter for each lens. More on this later.

10. Camera Body. If you have an extra body bring it.

11. 24mm to 70mm lens.

12. 70mm to 200 lens.

13. 200mm to 500mm lens.

The above three lens kit can be modified by using a selection of zooms. I personally carry a 200mm to 500mm and a 28mm to 300mm plus a 1.4 Tele Extender as my lens kit. After extensive testing these three lenses show excellent contrast, color, and sharpness. More on this later.

I use a mono pod with a three leg bottom piece and quick release mounted to a ball socket head. With some practice this has allowed me to pan the 200/500mm lens on the mono pod.

I recommend the largest ball socket head you feel comfortable with. The larger the ball the less likely your camera will shift in the middle of a pan. The quick release just makes life simpler.

This list has been compiled over the years to keep me equipped and comfortable. How heavy is your equipment bag late Sunday evening as you are lifting it up to the overhead baggage compartment? After carrying your camera and 500mm lens around for three days can you still hold it steady and pan smoothly Sunday? Maybe a mono pod will help?


Computer.

Desktop with mouse and pad.

External hard drive. Shooting RAW images you will use up computer storage place in a hurry. An external hard drive is insurance against running out of storage space.

Device to download memory cards.

Power cord.

Extra cables.


iPhone with charger.


Personal needs.Sun screen. Be sure to clean your camera and lens each night. Once you allow the sun screen goop to dry on your equipment it’s hell to clean.

Damp wash cloth in a ZipLock bag. Use this to clean your hands after applying sun scree.

REI sells a neck scarf that you soak in water then wear around your neck to stay cool. This really works and you should have at least one.

Base ball caps are cool but a soft broad brimmed “old mans” or fly fishing hat will keep you out of the dermatologist office.

Sun glasses.

Rain jacket.

Wind breaker.


Options: Some sort of equipment vest. I use a Patagonia fly fishing nylon net vest.

Knee pads for that low angle shot.

Cargo pants with extra pockets. Many tracks do not allow shorts.

Water in a cooler. This is really not an option. Last year my friend Pete Lyons past out from dehydration and left the track in an ambulance.

Comfortable walking shoes or boots. No sandals.

No, absolutely no red, yellow, green, or blue shirts or jackets. Look if a driver confuses me in a red shirt for a waving red flag he has more problems then my red shirt. Still them’s the rules.

Now that the equipment is handled. Do you have your credentials, tickets or other paper work ready to go. Place it all in your equipment bag so you do not forget it.

Spend a little time reviewing coverage from earlier events of the track/eventyou are shooting. Pick out favorite corners. Check out the time of day, long shadows or morning fog may all add to your shot. Do a little research before you show up.

Send me an email I’ll be happy to answer any questions.

DennisGray711@mac.com